Wednesday, November 28, 2012

How to make a pencil holder with a can!

    Today as you know I am going to show you how to make a pencil holder. This is a really fun craft to do. I have tried to do this and it turned out great! But, the only thing is that you have to be careful when you do this craft because you have to use a hot glue gun. This craft is also great because you are reusing a can! I hope you enjoy this craft.

The can should look something like this.
   Things that you will need:

* washed can
*hot glue gun
*pencil
*magazine or newspaper squares
*gluestick

  First you need to pick a fairly large can and take the label off of it and wash it. Next, you need to get your newspaper or magazine squares (I recommend magazine) and put your pencil on one edge of it and roll the paper so your pencil is inside of it and take your glue stick and glue the end of it together and take your pencil out so it is a tiny tube. Then you have to make about 60 more tubes just like that or depending on the can. After you made all the tubes you have to hot glue gun them on the outside of the can. If the ends are sticking out or excess pieces then you can just cut them off. Then you are all done and you made a recycled can pencil holder! I hope you liked this craft and if you have any ideas on any other craft you want to do just comment below.

Wednesday, November 21, 2012

Its Thanksgivin' Time

   I can't believe its already Thanksgiving! Today I will give you guys some facts about Thanksgiving and the history about it. This post will be a special post for the holidays and I will try to do a post for each holiday. Oh, and I am also sorry that this post is so late because Thanksgiving is tomorrow! Okay so lets get started.


  The first Thanksgiving was in 1621. It was a 3 day festival of hunting,eating, and other entertainment. Thanksgiving was in honor of the pilgrims' first successful harvest. The Indians killed 5 deer as gifts for the colonists. They did not have turkey and they did not have potatoes or pumpkin pie because it was not introduced to New England yet. But they did have deer and they may have eaten cranberries but if they did then they would be served plain and not in a sauce or relish. Thanksgiving did not become an annual tradition until more than 200 years later! You can get a lot of Thanksgiving information like this at... http://www.history.com/

  Now I will show you a Thanksgiving video about the story of Thanksgiving. I chose this video to show you guys because in the video it shows drawings of the events the man is singing about and that is art related for an art blog. The information that I gave you above will probably not really show up throughout the video because it is a quick summary of the history. The video shows pretty cool drawings if you look at it in an art perspective. The video teaches a lot of information and I hope you enjoy it! The video is on this link... http://www.history.com/topics/thanksgiving/videos#the-mayflower

 I hope you liked this special Thanksgiving post and Tune in to many more special posts for the upcoming holidays. 


Tuesday, November 20, 2012

Basic Drawing

Basic Drawing

Today I am going to show you how to do basic art. First I am going to show you how to draw an "Angry Birds" and an "Angry Birds" pig. These little birds are fun to draw and they are easier to draw because they don't have that much detail. The pigs are also fun to draw because of their different appearances or looks. You should definitely try to draw "Angry Birds" if you are a beginner in art or I even recommend that someone that is not a beginner should try to draw these for more art practice. First I am going to show you how to draw a pig...

Today we will show you how to draw green pig from angry birds. Learn how to draw this character with the following simple step to step tutorial.
You Might Like Our Other Angry Birds Game Characters Tutorials

How to Draw Green Pig from Angry Birds with Easy Step by Step Drawing Tutorial

How to draw cartoon green pig with easy step by step drawing tutorial

Step 1

Step 1 : Drawing Cartoon Green Pig in Easy Steps Lesson
Draw an oval shape and then draw the guidelines to help with the placement of the facial features.

Step 2

Step 2 : Drawing Cartoon Green Pig in Easy Steps Lesson
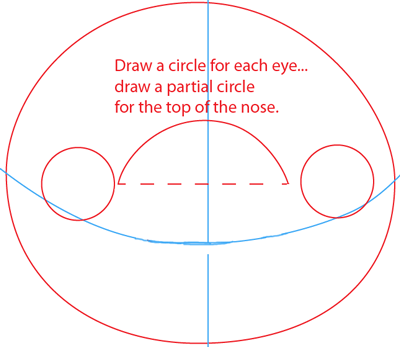
Draw two circle far apart, one for each eye. Then draw a partial circle for the top of the nose.
Step 3
Step 3 : Drawing Cartoon Green Pig in Easy Steps Lesson
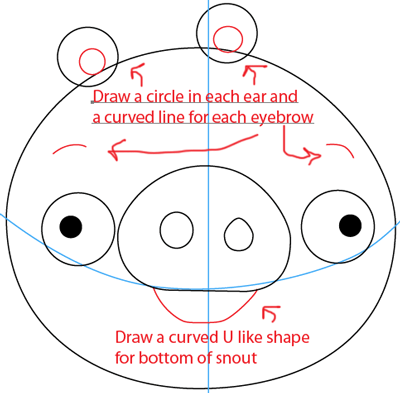
Draw two circles for the ears and for each eye a circle for the pupil. To finish the nose, continue an oval shape looking like the illustration above. Then draw for the nostrils, first nostril is an oval and the second nostril an egg shape.

Step 4

Step 4 : Drawing Cartoon Green Pig in Easy Steps Lesson
Draw a circle in each ear and a curved line for each eyebrow. Draw a curved U like shape for the bottom of the snout.

Finished Drawing

How to draw cartoon green pig with easy step by step drawing tutorial
I hope that this tutorial helped you in drawing a green pig from angry birds and that you had a lot of fun  :)!
I got this from http://www.drawinghowtodraw.com/stepbystepdrawinglessons/2011/07/how-to-draw-green-pig-from-angry-birds-game-in-with-easy-step-by-step-drawing-tutorial/  I also got the green bird information from the link above.

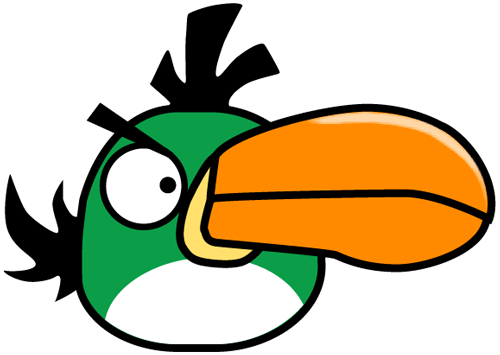
The next thing that I will show you is how to draw some "Angry Birds"! Today we are going to learn to draw the green bird! This is the last thing that I will show you how to draw today. Drawing the green bird might be hard but, practice makes perfect. The picture next to this text means that you should never give up! Stay tooned for more art and crafts. If you have any suggestions or comments feel free to share them with me.

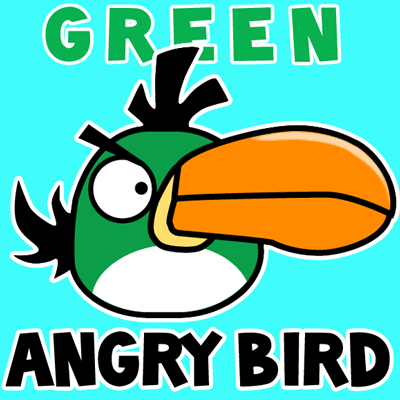
Today we will show you how to draw a green toucan bird. Learn how to draw this character with the following simple step to step tutorial.


How to Draw Green Toucan Bird with Easy Step by Step Drawing Tutorial

How to draw green toucan bird with easy step by step drawing tutoria

Step 1

Step 1 : Drawing Green Toucan Bird in Easy Steps Lesson
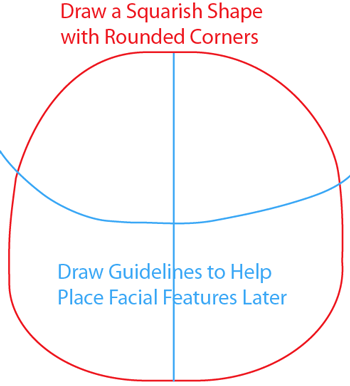
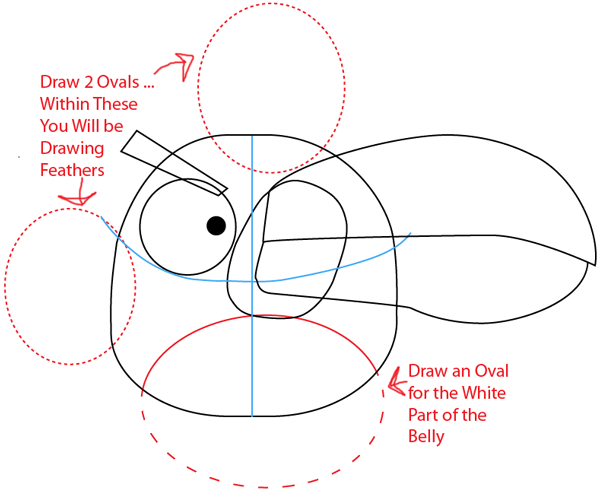
Draw a squarish shape with rounded corners then draw guidelines to help place facial features in the later steps.

Step 2

Step 2 : Drawing Green Toucan Bird in Easy Steps Lesson

For the left eye, draw a normal circle. Place an oval to the right of the eye (a place for the beak).
Step 3
Step 3 : Drawing Green Toucan Bird in Easy Steps Lesson
Draw two lines over the left eye to start the eye brow. Draw the beak by drawing a capital letter E with a circle at the end of it.

Step 4

Step 4 : Drawing Green Toucan Bird in Easy Steps Lesson
Draw 2 ovals as the guide circle for the feathers. Also draw an oval at the bottom for the white part of the belly.

Step 5

Step 5 : Drawing Green Toucan Bird in Easy Steps Lesson
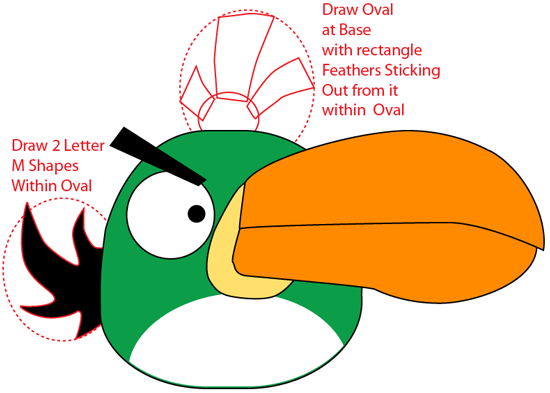
For the feathers on the left, draw two letter M shapes within the oval. For the feathers on the top, draw an oval at the base with rectangle feathers sticking out from it within the oval.

Finished Drawing

How to draw green toucan bird with easy step by step drawing tutoria
I hope that this tutorial on how to draw a Green Toucan Bird helped you and that you had a lot of fun :)


Wednesday, November 14, 2012

                                     Crayons!

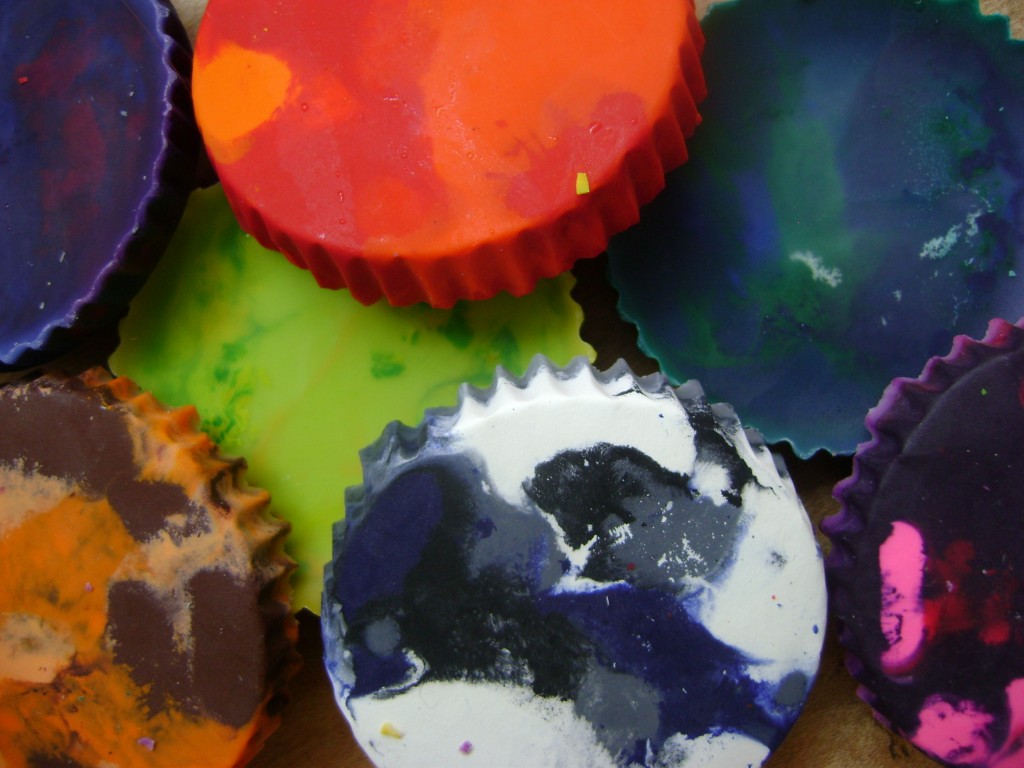
   Today I am going to talk about crayons. You can make a lot of different crafts with crayons. One craft that I found is how to make a melted crayon or recycled crayon. I found two different directions on how to make them. I hope that one of them can help you make the craft even better. So, lets get started!

                              Confetti Crayons
  
August 14 010 

I’ve seen these all over the place lately and have been anxious to try them. You may have tons of crayons around your house–but if not, luckily, they are about 25 cents in all the Back To School sales now-a-days.
August 13 028
Peel off the paper. When I was a kid–this was easy. But crayons today are a bit more snooty.  They have some plastic stuff under the paper to help the crayons not break so easy–which also makes the paper harder to get off. Ask for help. I was surprised at how many people like to take the paper off of crayons.
Break them up and sort them into whatever color combos interest you.
Lyndi's camera 044Lyndi's camera 041
Drop them in paper lined cupcake pans. Heat the oven to 350 degrees, then turn it off. Set the pan on the top rack and leave them there for about 10-15 minutes…
Lyndi's camera 052
until they look about like this.
August 14 002
Set them in the freezer for about an hour.
August 14 004
Peel them out of the paper…
August 14 009
and there you have it…
August 14 019

 I got this fromhttp://www.graciousrain.com/2009/08/24/confetti-crayons/


  Tip: You can use a veggie peeler to peel the crayons. 


  So, the other direction that I found was slightly different because you can use a grater to shred the crayons into pieces. If you want to use a grater then you should grate it on the smaller side. You should try to spread the colors so you can get an even better effect. The rest of the directions are the same as above. I hope you guys liked making these recycled crayons. Comment below if you liked this craft and if you have any suggestions for my next post.


Thursday, November 8, 2012

      Duct Tape!

Hi, guys. Today I am going to teach you how to do a duct tape flower. I really like how to do this art project. You guys should really try to make this. I love this art project because it is very simple to make. This is a great thing to make


Instructions


1. For each flower put a pipe cleaner with green electrical tape, leaving an inch or so at one end uncovered.

 
2. Fold a 9-inch piece of duct tape in half, sticky sides together. Fold the tape in half again and cut a teardrop shape, keeping the edge intact to create a figure eight. Repeat with2 more strips of tape.

3. Stack the petals and secure them by wrapping the uncovered end of the pipe cleaner around the centers. Fan out the petals and add a small piece of tape at the back to hold them in place.
 
4. Stick a contrasting color of duct tape onto waxed or parchment paper and cut out a 1/2-inch circle. Peel away the backing and stick the circle in the center of the petals.

5. For a leaf, fold a 6-inch piece of green duct tape in half with a 2 1/2- by 1/2-inch strip of waxed or parchment paper sandwiched between the ends. Cut a leaf shape, then remove the paper from the base of the leaf and wrap it around the pipe cleaner stem