Thursday, December 20, 2012

Christmas

 Christmas

    I know that the upcoming holiday,Christmas is coming but,do you know what it actually means? Do you think that it is a time of just getting presents or do you even know the story behind it? Maybe...not. So, I will share with you the true meaning of Christmas.
   What do you celebrate Christmas for? People celebrate Christmas to remember the birth of Jesus. People don't know the precise birth of Jesus but, every year Christmas is still celebrated on December 25. Christmas is celebrated all around the world and is celebrated by an increasing number of non-Christians. Not everyone celebrates Christmas because of their nationality.
   What is the story of Christmas? It is also known as the Nativity Story. There was a woman named Mary, and God was sending her a baby and she was supposed to name him Jesus. Mary was supposed to take Joseph as her husband also. There were three kings and they knew that there was going to be a new king born (that would be Jesus) soon. So, the king of Mary and Joseph's city heard about a king being born and demanded the husband of each wife to go to their hometown where they were born to do a census. Joseph was born in Bethlehem so Mary and Joseph had to travel there.Mary was already  pregnant with Jesus so they took the families donkey and set off to their journey. It was a long journey and while they were on it the three kings were following the star to find Jesus. After a few days Mary and Joseph reached Bethlehem and Jesus was born in an animal stable. The three kings reached their destination and found Jesus at the stable and gave him three gifts. An angel came to some shepherds and told them that a king was born in the stable close by and the shepherds came to see Jesus also.
    What kind of traditions do people have for Christmas? Many people have different traditions for Christmas. But, Christmas is about giving and sharing. So, during Christmastime people buy a Christmas tree and give each other presents. That is the usual Christmas tradition. People also decorate with a bunch of lights outside on their house.
   Now to end this post I am going to show you how to make a Gum Drop Garland! This craft is pretty easy but, you have to be careful to not prick yourself with the sewing needle. The last post I did was How to make a Gum Drop Pomander Ornament so this year if you do both of the crafts then you will be the Gum Drop house this year! Lets get started!
        Gum Drop Garland {Tutorial}

Photobucket I adore how my Gum Drop Garland turned out. It is soooo easy and fast and just adorable. See?

And it cost me only $1.00!!
My gum drop garland is wrapped around a grapevine tree in my “collected” foyer.  However, you can use a gum drop garland anywhere your sweet, big heart pleases.  I thought it also would be cute to make little strung ornaments out of 3-4 gum drops.
Anyway, on to the tutorial…
Photobucket
Supplies Needed:
  • Gum Drops 1.00/bag at the Dollar Store
  • Scissors
  • Upholstery Thread or Fishing Line
  • Long Needle
  • Damp Rag to wipe off your sticky fingers and needle.
Photobucket
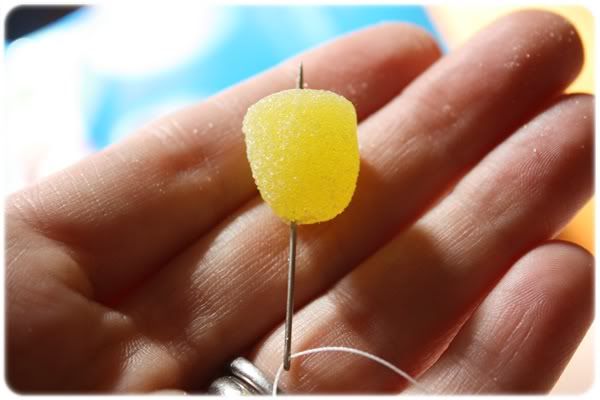
Cut a piece of thread as long as you want your garland. I cut mine around 4 feet long.  Knot the end.  Then begin threading on gum drops.  I alternated colors and the direction of the gumdrops as you can see in the first picture.
PhotobucketAfter several gum drops your needle, thread and fingers will begin getting sticky. Just wipe them off and keep at it!
Photobucket
Or, I guess you could lick your fingers if you’d like! :)
Photobucket
Looking a.d.o.r.a.b.l.e!!!
Once you’ve finished threading the gum drops, knot the thread and cut off any excess.  Then have fun decorating with this whimsical gum drop garland!
Photobucket
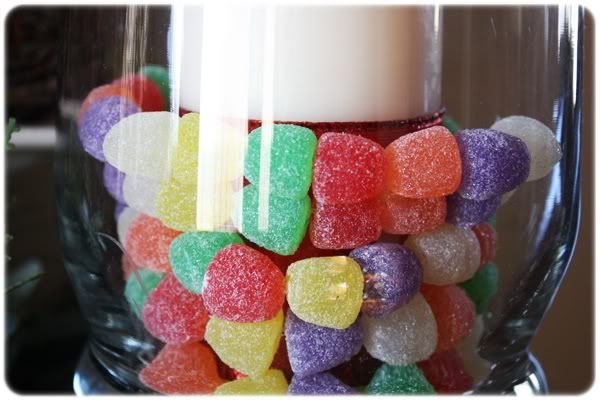
…add it to a candle holder…
Photobucket
…or drape it over a mirror…
Photobucket
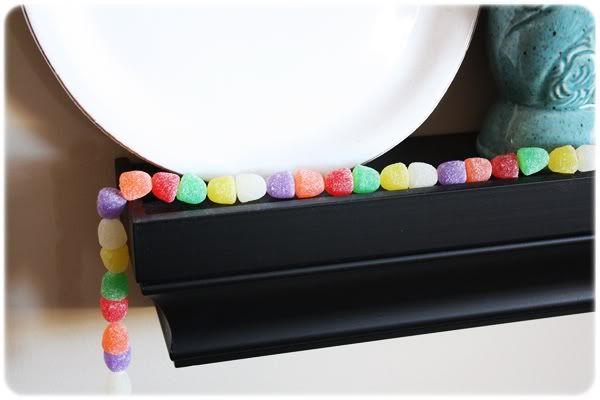
…hang it from a shelf…
Photobucket
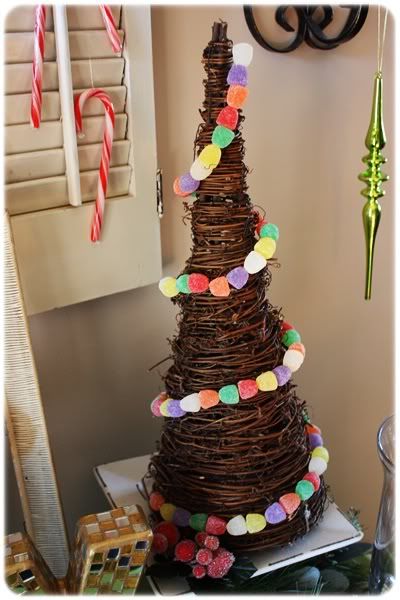
…or wrap a grapevine wreath with it like I did in my foyer
Photobucket
So there you have it…how to make a fun, frugal and whimsical gum drop garland.  As always, please use discretion where you place your garland if you have little children.
P.S. I’ve had my gum drop garland made and in my foyer for two weeks and I haven’t had any issues with bugs! :)
Are y’all ready for Christmas?

 I hope everyone liked this special Christmas post and stay tuned to many more posts coming soon. If you have any comments just post them below! Merry Christmas and have a Happy New Year!
I got this from:http://myblessedlife.net/2010/12/whimsical-gum-drop-garland-tutorial.html
          

Thursday, December 13, 2012

How to make a Gum Drop Pomander Ornament!

Well today we are making Gum Drop Pomander Ornaments. This is a pretty easy craft to make. I chose to make this craft because it has candy on it and it is colorful. It is almost Christmas time too! This craft can really bring delight to your house and family because who does not like candy! But, anyways it is a great way to spread some sweet Christmas cheer this year! Now lets get started!

 I guess I’m in love with candy this year…at least decorating with it. Candy is cheap and when grouped together it is quite beautiful. I’m all about getting a lot of bang for very little buck. Ha!
One day recently, the idea popped into my head to decorate with gumdrops.  Introducing….Gum Drop Pomander Ornaments!!
Fabulous, eh?
Last year I hung candy canes from my chandelier and this year it’s gum drops. I wonder what next year will bring! :)
I know you’re just itching to make a few of these yourself, so let’s get to it!
Supplies You’ll Need:
  • Styrofoam balls {super cheap at Walmart!}
  • Ribbon
  • Straight Pins
  • Hot Glue Gun and Glue Sticks
  • Gum Drops
  • Scissors
Squeeze a dab of glue on a foam ball and then attach the ribbon with a pin through the hot glue.
Loop the ribbon around then glue and pin the ribbon in place.
Begin gluing gum drops in place – alternating colors until the entire ball is covered.
{getting pretty!}
Hang your awesomely fun gum drop pomander ornament…
…on a stand…
…from a chandelier…
…on your Christmas tree, if it has strong branches.
Or you can make the gum drop ornaments without ribbon and
…decorate candle sticks…
or add your gum drop balls to a Christmas vignette.
It would be lovely to make several of these and hang them as a collection. I used fishing line to hang mine from the chandelier.
So, what do you think?

Thursday, December 6, 2012

How to make a snow globe

   It is the beginning of December and now people are starting to decorate for Christmas. I know it is still early to fully decorate for Christmas now so today we are going to make a Christmas snow globe! There are many ways to make it but,this is the easiest way that I found to make it. Lets get started!


   Snow globes are magical, whimsical, and fun.  And they’re super easy to make at home.
The first thing you need are jars, with nice snug lids.  Check out your fridge; I grabbed an almost empty bottle of peperoncini peppers . I also had a bottle of capers, and a big jar from marinara.  Marinated artichoke heart jars work really great for these, as do little teeny tiny baby food jars.  Really any size jar works; you just have to find things to fit inside of them.

You can be creative with the items that go inside your snow globe, it’s just important that they are made of materials that won’t break down in water.  Think plastic, ceramic, etc.  If you’re not sure, just try placing the items in a bowl of water for a few hours and see if they start doing weird things.  Try thrift and craft stores for little winter-themed figurines.

Another really fun thing is to make your own little figurines with Sculpey Clay.  You can buy all different colors at almost any craft store and it just bakes in the oven.  A snowman would be super easy to make!  I snipped all of my greenery off of artificial garlands I have around my house.

I decided to take it up a notch though, and put something extra special inside.  I can’t tell you how much I love it when I have an idea in my head and it actually works like I thought it would!  I just took a photo of each kiddo, printed it out on my home printer, cut it out, and ran it through my laminator .If you don’t have a laminator, most copy stores have lamination services that don’t cost much.  Make sure when you cut around your lamination, you leave a tiny border so it stays sealed up.

      You will create your scene on the underside of the jar lid.  I just use plain ol’ hot glue.  You might want to take a piece of sand paper and rough up the inside of the jar lid so the glue adheres better.  I didn’t do that with this batch and everything has stayed put just fine, but something you can try.  If you have things with wide, flat bases, they’re easy to just glue right on.  But if you have something like my little plastic pictures, or a tree sprig with a tiny twig at the bottom, I’ve found that it’s easier for me if I have something like little rocks (those blue things you see in the photos; they’re aquarium rocks from the pet store that I had from another project) to help keep things in place.  It will make sense when you do it, but basically you can pile some glue down there, put your object in, and then mound some pebbles around it to adhere everything together as the glue dries. 

      It’s just important to remember to keep things away from the edges enough that you can still screw the lid onto the jar, so don’t fill the entire base with glue or rocks.  When everything is dry turn it upside down and shake it a few times to make sure nothing falls off!
The next step is filling up your jar with water, almost to the very top and dumping in a bunch of glitter.  I recommend adding a little more glitter than you think you need, especially if you have greenery because some of it will get stuck in there.

One thing you can do is add some glycerin, which makes the glitter float down a little slower than it does in plain water.  (Or  that baby oil accomplishes the same thing.  You can also find snow globe “snow” at some craft stores.)  Glycerin can be found in the baking aisle of craft supply stores in small bottles.  If you have some already, or find it easily, you can try that out.  I did a side by side test and found that it didn’t make a huge difference, unless I added quite a bit.  Probably at least 2-3 teaspoons per cup of water.

You know the Wilton gel colors we use in everything?  Well if those get dried out, you can add glycerin to them to restore the consistency.  You can also add it to homemade soap bubbles to make the bubbles stronger. I’ve heard you can also buy it at drug stores, often near the first aid supplies.   Isn’t it kind of interesting when things can be found in both the cake decorating and first aid aisles??  Didn’t know that, but I read it on the internet, and if there’s one thing we all should know by now it is that everything on the internet is true.  The internet is also where I discovered that if you have some benzoic acid laying around, you can make your own snow.
Anyhoo…just carefully squish your stuff in the jar as you put the lid on and tighten it.  You can put hot glue on the edge of the jar if you’re want to seal it up.  Or you could put some colored electrical tape around the edge of the jar.  I left mine un-glued  (and I strongly suggest you do, at least at first) in case I had to open them up to fix anything, or store them without water until next year, or change the water if it got cloudy, etc.  I found out that one of my little red berries was painted and turned the entire snow globe pink so I was glad they weren’t glued shut and I could just snip it out and re-fill it.  My jars haven’t leaked.  I do flip them over sometimes and set them lid-side-up just in case.  Either way it’s best to display them somewhere that won’t be damaged if a little water leaks out.

You can also paint your lids if you want to cover up the labels on them.  I’m much too lazy for paint.  (But not too lazy to laminate my children and put them in winter scenes inside of snow globes.  It’s all about priorities, people.)
I got this from:http://www.ourbestbites.com/2011/12/how-to-make-a-homemade-snow-globe/


Wednesday, November 28, 2012

How to make a pencil holder with a can!

    Today as you know I am going to show you how to make a pencil holder. This is a really fun craft to do. I have tried to do this and it turned out great! But, the only thing is that you have to be careful when you do this craft because you have to use a hot glue gun. This craft is also great because you are reusing a can! I hope you enjoy this craft.

The can should look something like this.
   Things that you will need:

* washed can
*hot glue gun
*pencil
*magazine or newspaper squares
*gluestick

  First you need to pick a fairly large can and take the label off of it and wash it. Next, you need to get your newspaper or magazine squares (I recommend magazine) and put your pencil on one edge of it and roll the paper so your pencil is inside of it and take your glue stick and glue the end of it together and take your pencil out so it is a tiny tube. Then you have to make about 60 more tubes just like that or depending on the can. After you made all the tubes you have to hot glue gun them on the outside of the can. If the ends are sticking out or excess pieces then you can just cut them off. Then you are all done and you made a recycled can pencil holder! I hope you liked this craft and if you have any ideas on any other craft you want to do just comment below.

Wednesday, November 21, 2012

Its Thanksgivin' Time

   I can't believe its already Thanksgiving! Today I will give you guys some facts about Thanksgiving and the history about it. This post will be a special post for the holidays and I will try to do a post for each holiday. Oh, and I am also sorry that this post is so late because Thanksgiving is tomorrow! Okay so lets get started.


  The first Thanksgiving was in 1621. It was a 3 day festival of hunting,eating, and other entertainment. Thanksgiving was in honor of the pilgrims' first successful harvest. The Indians killed 5 deer as gifts for the colonists. They did not have turkey and they did not have potatoes or pumpkin pie because it was not introduced to New England yet. But they did have deer and they may have eaten cranberries but if they did then they would be served plain and not in a sauce or relish. Thanksgiving did not become an annual tradition until more than 200 years later! You can get a lot of Thanksgiving information like this at... http://www.history.com/

  Now I will show you a Thanksgiving video about the story of Thanksgiving. I chose this video to show you guys because in the video it shows drawings of the events the man is singing about and that is art related for an art blog. The information that I gave you above will probably not really show up throughout the video because it is a quick summary of the history. The video shows pretty cool drawings if you look at it in an art perspective. The video teaches a lot of information and I hope you enjoy it! The video is on this link... http://www.history.com/topics/thanksgiving/videos#the-mayflower

 I hope you liked this special Thanksgiving post and Tune in to many more special posts for the upcoming holidays. 


Tuesday, November 20, 2012

Basic Drawing

Basic Drawing

Today I am going to show you how to do basic art. First I am going to show you how to draw an "Angry Birds" and an "Angry Birds" pig. These little birds are fun to draw and they are easier to draw because they don't have that much detail. The pigs are also fun to draw because of their different appearances or looks. You should definitely try to draw "Angry Birds" if you are a beginner in art or I even recommend that someone that is not a beginner should try to draw these for more art practice. First I am going to show you how to draw a pig...

Today we will show you how to draw green pig from angry birds. Learn how to draw this character with the following simple step to step tutorial.
You Might Like Our Other Angry Birds Game Characters Tutorials

How to Draw Green Pig from Angry Birds with Easy Step by Step Drawing Tutorial

How to draw cartoon green pig with easy step by step drawing tutorial

Step 1

Step 1 : Drawing Cartoon Green Pig in Easy Steps Lesson
Draw an oval shape and then draw the guidelines to help with the placement of the facial features.

Step 2

Step 2 : Drawing Cartoon Green Pig in Easy Steps Lesson
Draw two circle far apart, one for each eye. Then draw a partial circle for the top of the nose.
Step 3
Step 3 : Drawing Cartoon Green Pig in Easy Steps Lesson
Draw two circles for the ears and for each eye a circle for the pupil. To finish the nose, continue an oval shape looking like the illustration above. Then draw for the nostrils, first nostril is an oval and the second nostril an egg shape.

Step 4

Step 4 : Drawing Cartoon Green Pig in Easy Steps Lesson
Draw a circle in each ear and a curved line for each eyebrow. Draw a curved U like shape for the bottom of the snout.

Finished Drawing

How to draw cartoon green pig with easy step by step drawing tutorial
I hope that this tutorial helped you in drawing a green pig from angry birds and that you had a lot of fun  :)!
I got this from http://www.drawinghowtodraw.com/stepbystepdrawinglessons/2011/07/how-to-draw-green-pig-from-angry-birds-game-in-with-easy-step-by-step-drawing-tutorial/  I also got the green bird information from the link above.

The next thing that I will show you is how to draw some "Angry Birds"! Today we are going to learn to draw the green bird! This is the last thing that I will show you how to draw today. Drawing the green bird might be hard but, practice makes perfect. The picture next to this text means that you should never give up! Stay tooned for more art and crafts. If you have any suggestions or comments feel free to share them with me.

Today we will show you how to draw a green toucan bird. Learn how to draw this character with the following simple step to step tutorial.


How to Draw Green Toucan Bird with Easy Step by Step Drawing Tutorial

How to draw green toucan bird with easy step by step drawing tutoria

Step 1

Step 1 : Drawing Green Toucan Bird in Easy Steps Lesson
Draw a squarish shape with rounded corners then draw guidelines to help place facial features in the later steps.

Step 2

Step 2 : Drawing Green Toucan Bird in Easy Steps Lesson

For the left eye, draw a normal circle. Place an oval to the right of the eye (a place for the beak).
Step 3
Step 3 : Drawing Green Toucan Bird in Easy Steps Lesson
Draw two lines over the left eye to start the eye brow. Draw the beak by drawing a capital letter E with a circle at the end of it.

Step 4

Step 4 : Drawing Green Toucan Bird in Easy Steps Lesson
Draw 2 ovals as the guide circle for the feathers. Also draw an oval at the bottom for the white part of the belly.

Step 5

Step 5 : Drawing Green Toucan Bird in Easy Steps Lesson
For the feathers on the left, draw two letter M shapes within the oval. For the feathers on the top, draw an oval at the base with rectangle feathers sticking out from it within the oval.

Finished Drawing

How to draw green toucan bird with easy step by step drawing tutoria
I hope that this tutorial on how to draw a Green Toucan Bird helped you and that you had a lot of fun :)